V.I.C. Ordering & Order Management
VIC (Virtual Inventory Cloud) is a direct-to-vendor ordering system, that allows your customers an option when products are out of stock at their servicing locations.
VIC Setup – Member Details & Location Management
In your ‘Member Details’ page, you will need to begin by entering your VIC ordering information: VIC URL, EDI ID, and username and password.
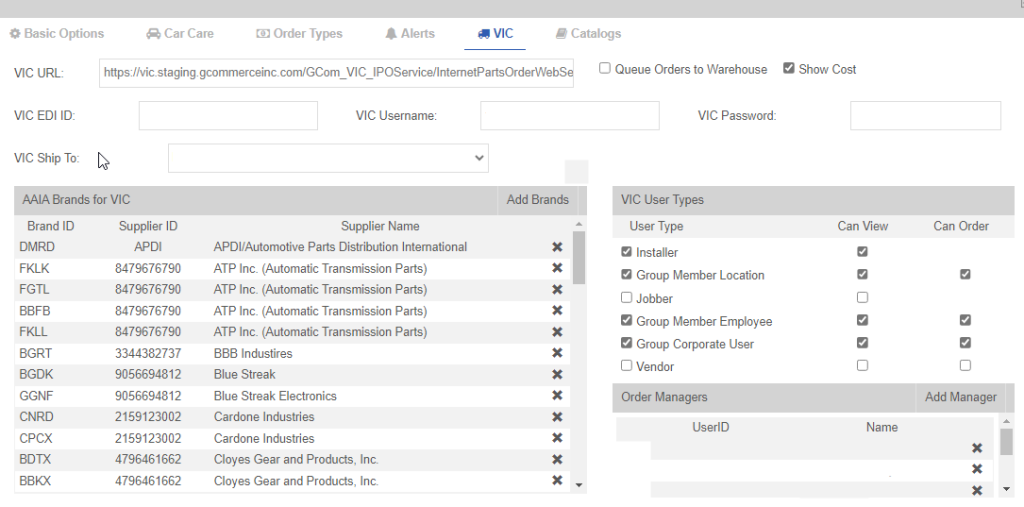
Once you have entered your VIC account information, make sure to add your AAIA Brands by clicking ‘Add Brands’, and selecting the brands you have supported for VIC ordering.
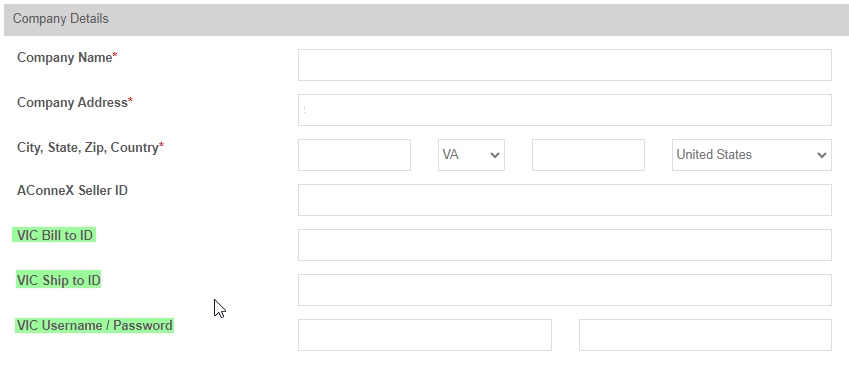
Also make sure to enter the VIC settings for each location you would like VIC to be available too, by going into ‘Location Maintenance’ in the main menu, and entering the VIC information in the fields shown below:
A new feature has been added, that allows you to capture V.I.C. orders as they are placed by users, and queue’s them for review on the VIC Order Management page. This can be setup in Member Details in the main menu, using the checkbox displayed below:
There are two ways in which you can have users queue their orders:
- By using the “Queue Orders to Warehouse” users orders will be placed into the VIC Order Management page. Using the ‘Order Managers’ field down to the right you can assign people to review and approve the orders or remove them.
- If you prefer to setup order queueing at a user level, you can leave the “Queue Orders to Warehouse” disabled, then go into User Details and check the “Queue VIC Orders” option. This will allow that individual user to queue up their orders for the day and place them all at once. This will also allow you to save on shipping for orders shipped from the same vendor location, if you select the same shipping methods.

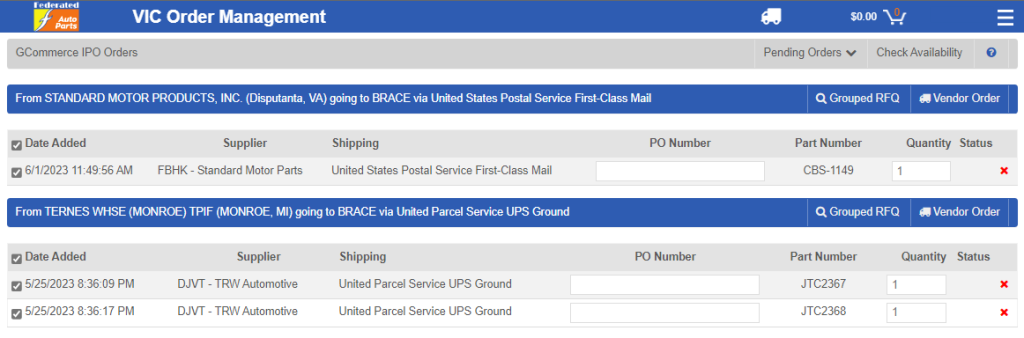
VIC Order Management
When you first open the page, all Orders for all Vendors are selected by default and the shipping that was chosen by the user is displayed. You may simply click the “Check Availability” button in the gray header bar and a “Request For Quote” will be sent for each Item that is checked to GCommerce. They will in turn respond with the availability which will be displayed in the Status column along with all of the shipping methods which will appear as a dropdown in the Shipping column. You may change the Shipping Method as needed. These updates are automatically saved when the selection is made. Items that are no longer available will automatically be unchecked and color coded to “red” if they are not available and “yellow” if they are backordered.
You may also use the “Auto Consolidate” feature to automatically group like items together. To use this feature it is recommended that you chose the checkbox in the header to unselected everything and then check a Item that you wish to consolidate. Items that can be consolidated must have the following thing in common:
- Same Ship From
- Same Ship To
- Same Shipping Method
- Same Supplier
While “Auto Consolidate” is turned on, checking a single Order will trigger the tool to find other Orders that may be consolidated with the checked Order. This can be used for re-checking availability as well as consolidating Orders when they are sent to the Vendor to get the best shipping rates. “Auto Consolidate” is turned off by default when you open the page.
Sending Orders to the Vendor
Sending Orders to the Vendor is based on what Orders are selected. This feature also uses the “Auto Consolidate” feature to determine which Orders may be consolidated for the best shipping rates. You do not need to check availability before you attempt to send an Order to the Vendor but, it is recommended to avoid any problems when Items are no longer available. You will be prompted to confirm that you want to send the Orders to the Vendor. Any incorrectly consolidated Orders will trigger an error which you will need to address. When an Order is successfully completed, the User that initially queued the Order will have a message placed in their Message Center indicating that the Order was completed.
Deleting an Order
Orders are deleted individually by clicking the red “X” at the right of the row. You will be prompted to confirm that you want to delete the Order. When an Order is deleted, the User that initially queued the Order will have a message placed in their Message Center indicating that the Order was deleted.
Displaying Sent and Deleted Orders
You may optionally display Orders that have been deleted or already sent to the Vendor. This is accomplished by selecting the Order Type from the dropdown in the gray header bar. Sent and Deleted are for informational purposes other. They may not be altered in any way.